Monday, June 18, 2012

Where Love Grows


Let us be grateful to people who make us happy, they are the charming gardeners who make our souls blossom. ~Proust
 

     It was 2005 and at forty-five I’d finally fallen in love and moved to Texas to be with the love of my life. This would be a big adjustment for a city girl like me. John supported my decision to give up my almost 20 year job in retail to become a homemaker and take time to explore my creative interests. I wanted to cook, bake from scratch, write my masterpiece, garden, craft, do yoga and put retail management on the shelf for a while to discover more of who I was inside.

     My main priority quickly became learning all I would need to know to get our food choices in line with our health goals. I read, researched experimented and developed a plan of action. We would eat fresh foods in season, prepared simply in moderate proportions. We would eat smaller meals more often and make our meals interesting and delicious. In no way were we prepared to sacrifice our love of trying new foods, fine wines and sweet treats. We were determined to find that balance between our health and quality of life while never losing the pure joy we find in eating all kinds of foods. 

     Forward to February 2010 John and I began talking about Valentines Day gifties. We had been learning about how the food we buy is sourced, reading Michael Pollan and realizing that the next step in our evolution would be to choose ingredients we felt were clean and ethically produced. To that end we decided that since Valentines Day is about our hearts, we would build beds and plant each other a garden that would care for and nurture our bodies and souls. I could think of no better gift. John built the beds and we prepared them for crops. He’d grown up in Ohio and his family had gardened every year so he was very familiar with what would follow. I grew up in Manhattan and did not know the first thing about what I was in store for. I did remember that my first year with John we planted a tomato and a squash plant and the feeling of bringing something into the kitchen that I had grown was so rewarding. I took photos as if we’d had a baby.
 

     With limited knowledge and unlimited enthusiasm I set out to comb the Internet for information. It’s funny sometimes you don’t know what you don’t know till you know it. I looked up planting layouts but forgot to look up planting schedules. I planted summer kale and broccoli, which I eventually found out are crops that thrive in cool weather. I learned what happen when you don’t get the composters ratio balance correct (its not pretty). I learned those pretty Disney like white moths will, if unchecked, decimate my crops. On the other hand I learned that the pesto I create from my own basil will transport me to herbal ecstasy and that my non ending crop of cucumbers will provide succulent bread and butter pickles that I will be enjoying all winter long.

    
 During this process I made a serendipitous connection between my twitter account and my inaugural gardening endeavor. I love it when two hobbies collide and both are made more enjoyable by the collision. I discovered a community, gardeners of all sorts sharing information and helpful hints. There were vegetable gardeners Landscapers, community activist gardeners and cooking enthusiasts like me, making the move to grow their own. I met some friends who deal with the unsung finer points of making ones garden a success, providing tools, seeds, fertilizer and décor. I learned of the magical properties of Moo Poo Tea, which insects were my friends, which were foes and how be an obgyn for squash blossoms when the bees never showed up to pollinate them.

John built these tiered strawberry beds
     My first year with a garden has provided me with more than just fresh vegetables. I have gained new friends, a feeling of accomplishment and the knowledge that anyone can stretch their boundaries beyond their own definitions of who they are and become what they dream of being.  


Thursday, June 14, 2012

Exploring The Navette, Lavender and Orange Flower Water: A Taste of Provence


 Some people like to paint pictures, or do gardening, or build a boat in the basement. Other people get a tremendous pleasure out of the kitchen, because cooking is just as creative and imaginative an activity as drawing, or wood carving, or music. ~Julia Child


     The day had arrived John and I were actually in Provence. How many times had I imagined what it would be like to walk in the footsteps of Van Gogh and Cezanne? Today it was happening it was me touring the coliseum in Arles, smelling the lavender and people watching at the local café. We wandered the maze of age old streets lined with shops where seas of napkins and tablecloths bright with the blues, reds and yellows of Provence seemed to wave a greeting and bid me to come in. Was everything more vibrant more charming and more delicious in the South of France or was I just excited beyond belief to actually be experiencing Arles, Aix en Provence and Cassis for the first time? The answer is probably a little bit of both. 


     It wasn’t long before our love of cooking and food in general led us to the rich and abundant delicacies available in the area. I was impressed by the French sensibility about food. They shop daily for fresh seasonal offerings at a myriad of local farmers markets that set up on a rotating schedule all over the region. Each shopper knows on what day and in what town each market takes place. The vendors pay close attention to the quality of their products and the look of their stalls. Never have I seen more appealing displays of epicurean delights than I have in France.


      While exploring Arles I met a woman running a small patisserie who, amused and entertained by my wide eyed enthusiasm for her baked goods, introduced me to a traditional local cookie-biscuit called the Navette. I found the delicious lavender navettes to be much like Provence itself, beautiful, with a colorful history and carrying a hint of the signature lavender scent. They were a bit harder than a cookie with a slightly chewy quality. They were not what I had expected but I enjoyed the flavor. She explained to me what I was tasting and why it was significant to the culture of Provence.


     Legend has it that Saint Marie arrived in a row boat on the shores of France near Marseille without a sail or an oar. The boat shaped cookie is said to have been developed in the late seventeenth century to commemorate that arrival and is closely tied to local Catholic tradition, so much so that the navette was blessed by the local Archbishop and to this day carries with it a sense of reverence and tradition. Interestingly enough the word navette  translates to the word shuttle and I can see how the biscuit resembles a weaver’s shuttle. I don't know if there is any history behind that reference but I'd love to find out someday.


     Our next stop turned out to land on market day in the magical port village of Cassis. I scurried through the small cobblestone streets toward the cheeses, breads, olives and charcuterie that I knew lay just blocks away. Nothing it seemed could stop me unless of course it was the cookie shop I passed along the way. I stopped short my eyes fixed on rows and rows of neatly stacked cookies and I was drawn into the large welcoming entry, the order and elegance of the cookie displays and the intoxicating smell.  I did get to the market that morning after a brief pause to sample the local navettes.   


      I decided then and there that I would bake these special biscuit style cookies when I returned home. Today is the day I experiment with a small batch of lavender navettes. I bake and cook all the time but this is a new type of recipe for me and I wonder if my home version will even slightly measure up to those I enjoyed in France. Maybe my enjoyment was wrapped up in the entire experience. Maybe my technique and recipe will improve with practice. Maybe sharing this recipe will encourage others to step out of their own culinary comfort zone. Maybe sharing this special moment in my life through food is what matters most. ...Maybe I’ll add orange zest and a few drops of orange flower water to some butter to serve with the navettes. hmmmm maybe.  


Navettes

 3 cups AP flour (plus a bit more)
1/8 tsp salt 
1 tsp baking powder (powder not soda)
3 Tbs softened butter
3/4 cup sugar
2 eggs
1 TBS orange Flower Water
¼ cup water
1½ TBS culinary lavender
(don’t overdo the lavender it can taste soapy if overused)

The Dough
Add the lavender and salt to the flour and set aside
Cream the softened butter with the sugar in a mixer
 (I used the kitchen aid)
Add the eggs
Add the orange flour water and water 
Slowly add the flour lavender salt mixture
(Low enough speed so the flour doesn’t fly everywhere)
Raise speed to med till all ingredients are incorporated
The mixed dough will look sticky but be fairly easy to scoop out with a bench scrape.
If needed add bit flour a bit at a time till it gets dryer and you can handle it. 
Divide the dough into 12 equal balls add flour if you need it
(Just enough to keep it from sticking to you hands)
Shape each ball into navette shape (oval with pinched ends)
Indent the top (deeply) lengthwise
you can make them smaller and have more navettes if you wish
    
 Baking The Navettes
Preheat oven to 350 degrees
Brush tops of navettes with an egg wash
Bake for about 20-25 minutes or until a light golden brown
Cool on cookie sheet.
 
Tip of the day: I was delighted to use orange flower water for the first time. I highly recommend adding a bit of this fragrant water to add a special twist to favorite recipes. I can’t wait to try it in my French toast batter, in my crepes and my cookie recipes. No matter how much time you spend in the kitchen there is always more to learn and more experimenting to do.
I’ll keep practicing with the navettes and I’m willing to travel back to Provence for a lesson anytime


Friday, May 25, 2012

Focaccia Pizza for our Memorial Day Road Trip

"We live in a wonderful world that is full of beauty, charm and adventure. There is no end to the adventures we can have if only we seek them with our eyes open." -- Jawaharal Nehru

 
We are headed out this evening on a road trip to California’s Central Coast for the Memorial Day weekend. For us travel, exploration and adventure have become a way of life. Every trip however brief is an opportunity to meet new friends, discover new towns and gaze in awe at nature’s beauty all around us.

When we take off on these weekend getaways we usually leave after work on a Friday evening. It has become a tradition of ours to pack a picnic dinner to enjoy on the way. Over time I have become quite creative with ideas that will work well on car trips. 

A splendid setting for a road trip picnic
 We always pack an assortment of nuts, dried fruit, homemade cookies and the ever popular carrot sticks but we try to keep our snack choices ever changing and tasty. I’ve baked kale chips, sweet potato chips, prepared fresh almond butter on celery sticks and popped popcorn. One of the handiest most enjoyed road trip dinners has been the focaccia pizza. Baking the focaccia is quite easy and provides a blank canvas to any topping that suits your fancy. This trip I’ll bake the pizza topped with caramelized onion, sun dried tomato, artichoke hearts and sauteed spinach with garlic.

Note: I like to caramelize the onion in advance and set it aside. It requires cooking at low slow pace to really make it turn out perfectly. 
 
The Focaccia
1.5   cups warm water +1.5 TBS (extra water needed when I use part wheat flour)
1      tablespoon yeast
1.25 teaspoon salt
2      tablespoon olive oil
2      cups AP flour
1.5   cups white wheat flour
¼    teaspoon cayenne pepper (to taste)
½    teaspoon of your favorite herbs (oregano, thyme, rosemary or any Italian combo)
2      tablespoons grated Parmesan (add it right into the dough)
Mix all above ingredients together (I use the kitchen aid mixer) till combined
When mixed I place dough on an oiled (olive) ¼ sheet pan (9X13)

 Note:
This dough is wetter and softer than other types of dough
I use a spatula to get it on the baking sheet.
I also put olive oil on my hands to keep the dough from sticking to me as I spread it out evenly covering the baking sheet.

I cover with plastic wrap and let it rise (about one hour)

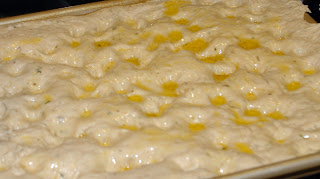
After it rises I make indentations with my fingers and drizzle a bit more olive oil on top.

I artfully place my toppings on the dough and place in a 375 degree oven till done
before adding cheese
After adding the cheese
 Today’s toppings

½ cup artichoke hearts
1,5 cups fresh spinach (I sautéed with garlic)
1 red onion (caramelized)
½ cup sun dried tomatoes (I chop and sprinkle)
1 cup shredded Mozzarella

I bake the pizza for 35-40 minutes till perfectly done.
Total Coast: around $10.00


This pizza is a great alternative to the classic sandwich and very adaptable to any occasion. When we travel I don’t use meat on the pizza but when I serve it at home I experiment with all kinds of toppings. If I have house guests I adapt the topping to include scrambled eggs and bacon crumbles topped with cheddar cheese for an easy fresh and unique breakfast offering. The roasted veggie version would even pair splendidly with a classic Italian dinner.
As you decide how to spend this Memorial Day weekend consider a picnic and consider this pizza. Whether you travel to a National Park, local fields of wildflowers or you simply venture into your own backyard, get friends and family together and delight in each others company.

Happy Memorial Day & Happy picnicking

Thursday, June 16, 2011

Pork Tenderloin With A Cherry Zinfandel Reduction


     In the past few weeks sweet and juicy cherries have been appearing, ripe and ready to devour at Farmer’s markets and grocery stores all over southern California. We always try to buy fresh local food when it’s in season and at this time of year the variety of produce makes cooking and meal planning a dream.

     This week I returned from the farmers market with my own bag of ruby red cherries ready to be devoured. I tossed around recipe ideas vacillating between sweet and savory delights and then in a moment I knew just what I wanted to prepare.

     As I watched my husband pour himself a glass of zinfandel my plan began to unfold. In a matter of moments I knew my cherries were destined to become part of a sweet savory pork tenderloin bathed in a cherry and zinfandel reduction.

Olive oil (to coat pan)
½  yellow onion (diced)
1 cup zinfandel
1 cup washed stemmed pitted cherries (diced)
2 tablespoons Apple balsamic vinegar 
(or any balsamic)
1 tsp sugar (to taste)
herbs ( like rosemary and Thyme
¼  tsp salt
¼ tsp pepper

For The Reduction
Add olive oil to pan
Add onion
Cook on low to medium flame till almost translucent (not brown)
Then add cherries and cook a minute or three
Add zinfandel ( use a wine you would not mind drinking)
Raise flame higher and reduce to about half
Add S&P to taste and adjust if needed

For the tenderloin marinade
¼ cup zinfandel
2-4 tbs olive oil
S&P
Herbs ( I like rosemary and thyme)
Garlic to taste
Mix well add tenderloin
Place in shallow dish or zip top bag
I placed the bag with the tenderloin and marinade in fridge(fridge a must) for 2-3 hours.

Beginning to brown toe tenderloin
To cook tenderloin
Heat a heavy bottom (le creuset type oven-safe dutch oven)
Add olive oil to coat bottom
Remove tenderloin from marinade
brown on all sides in dutch oven
when all sides are browned
Add 1/2 cup zinfandel and water or broth combined
Place in a preheated 350 degree oven till done
internal temp of 160 degrees (per USDA)
(while pork cooks warm up your cherry zinfandel topping)


After resting the pork 
(always rest the meat or you will lose the moisture)
slice and top with heated cherry zinfandel reduction
About $10-$17 dollars for this special treat including leftovers.


Monday, June 6, 2011

Spicy Asian Noodles At Home: Yes You Can


      I inherited my love of Chinese food from my father. I grew up going to our local Chinese restaurant the Harbin Inn on 100th Street and Broadway almost every week. As I grew my travels took me all over the world and eventually led me to spend some time living in Hawaii. Why, with all that exposure to Asian influenced cooking was it so difficult to travel to my local Asian market and pick up the ingredients necessary to create one of my favorite ethnic foods at home?


     It was not until I was in my thirties that I began to experiment with unusual labels and ask questions about various exotic sounding ingredients. Through experimentation I found I had been missing out on some wonderful flavors.  Since then I have made a point of putting together several delicious and economical Asian meals I can prepare in very little time.

     I urge everyone to take a trip to the Asian markets, talk to the vendors and try something new. More and more supermarkets are including larger ethnic departments so if there is no Asian market in your area explore your local grocery store. I’ll bet there is more available than you realize.

I have fallen in love with this product called spicy chili crisp

½ olive oil and ½ sesame oil to coat pan (whatever is on hand is OK)
½ large head of cabbage (shredded)
1 med yellow onion (diced)
2 carrots thinly sliced
1 rib of celery diced
¼ cup diced red peppers ~about ½ of a pepper (optional)
1 baby bok choy
3-6 cloves of garlic ~to taste (minced)
1-teaspoon approx Chinese chili sauce 
(to taste as some will find it hot)

S&P to taste

Beginning to cook the veggies
place the oil in a large skillet
add the onion to pan and cook till almost translucent
add the garlic and cook one more minute
add the cabbage, carrots and bok choy
cook down till all are soft
add soy sauce (any kind you wish 2-4 Tbs) (to taste)
add Chinese chili sauce 
(I use the one pictured below)
(invest in a trip to the Asian market or international aisle of your grocery store)

add cooked noodles to the veggie mix and let them soak up the flavors
continue to stir and mix  the veggies with the noodles
(I made my own noodles but use any kind you are comfortable with maybe try several till you find a few you love) I used my standby pasta noodle recipe.
Total around $5.00 for this trip across the globe
Ready To Serve


Tuesday, May 10, 2011

Sharing Seasonality ..It's Just That Easy


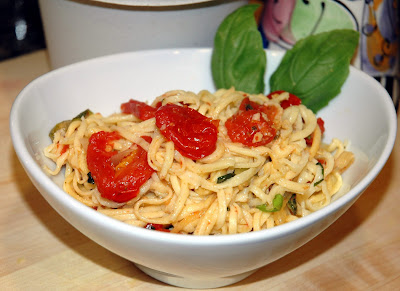
     A delicious, filling and reasonably priced meal does not have to be an impossible dream. Spring and summer provide a multitude of fresh seasonal produce literally ripe for the picking. I love the versatility that just a few simple ingredients can provide. At our house, we have developed a love for the taste and texture of home made pasta. Tonight pasta becomes a perfect yet simple complement to our roasted vegetables. 

     Whenever I’m kneading dough or creating noodles I think of all the families who would so enjoy making pasta together. As a child I loved spending time in the kitchen baking and cooking with my great grandmother. She had a collection of pans and kitchen tools that were just my size and I felt so special helping her. I would love to see more families gathered in the kitchen creating meals and memories. More importantly it would be an excellent opportunity for parents to teach their children a respect food. They could learn where their comes from and how important proper nutrition is while enjoying time spent with Mom and Dad. …And yes….it is just that easy


 For the pasta

2 eggs
1.5 cups flour
a splash or two of olive oil
healthy pinch of salt
(2-4 teaspoons of water *)
mix by hand or in a food processor
*add just enough water for the dough ball to come together
wrap dough in plastic wrap & place in fridge for a least an hour
then either roll out and cut (on a lightly floured surface)
or use a pasta machine to create your noodles.


for the veggies

toss the
diced Zucchini
sliced onion  
slit Cherry tomatoes
in a bit of olive oil
salt and pepper & red pepper flake (to taste)
place on a sheet pan
in a 350 degree oven
till soft and slightly caramelized

boil the pasta to cook 2-3 min
(it will cook much faster than dry pasta)
add noodles to the veggie pan and toss
(add a bit of the pasta water too)

snip some basil from the garden
tear it into pieces and add a palmful to the pasta
drizzle with olive oil
add some fresh oregano
and ½ cup grated cheese
I like romano or Parmesan
(experiment with other hard Italian cheese too)

Total under $5.00 for this simple but satisfying meal

Friday, May 6, 2011

Baked Blossoms of spring


     Spring is here and each week our local farmer’s markets add more gorgeous fresh produce to their stalls. I arrived at the South Pasadena Thursday market wondering what delicious crop would be showcased this visit. In weeks past we enjoyed the fresh garden peas, adding their shoots to our lettuce wraps and opening each pod to release six to eight little green jewels of freshness which were to become the stars of our cold pea & leek soup.


     I wandered among the stalls becoming part of the market dance. Each week as if choreographed we shoppers rhythmically dodge each other as we dip into our chosen stalls, eyes on the foot traffic, yet distracted by the sample trays. I greeted several of the farmers I have come to know and we chatted about what was growing, recipe ideas and of course the weather. There is a palpable spirit of community at most markets where consumers and farmers connect. I like looking into the eyes of the people who grow my food and supporting their efforts.

     As I approached one of my favorite stalls I spotted the most beautiful squash blossoms nestled together in their basket looking like the very picture of spring.
I knew right away they had to be on this week’s menu. Today is the day we will enjoy stuffed squash blossoms. I did not deep fry these blossoms opting to bake them instead. They are not exactly like the deep fried version but I enjoy this lighter adaptation just as well.

Ingredients
6 squash blossoms 
(cleaned blossoms  with all the stamen completely removed)

For The Filling:
½ -¾ cup part skim ricotta
2 tbs.finely grated Parmesan cheese
¼ tsp tarragon
white pepper to taste
salt to taste (be careful because the cheese is salty too)..
healthy pinch of lemon zest
a tiny pinch of nutmeg (if you like nutmeg ~I do)

For The Batter
Flour
white vermouth (white wine or milk will work as well)
water.
Batter should be thick enough to lightly coat (not too thick)
Add flour with equal amounts water and white vermouth 
Till you achieve the desired consistency
Use your favorite batter recipe. (I experiment all the time)

Directions
carefully open each blossom (cleaned & stamen removed)  
 add cheese mixture
cover the cheese with the leaves and twist top to close
(Don’t over fill)
dip blossoms in batter:


Lay the batter-dipped blossoms on a lightly oiled sheet pan (I used grapeseed)
Grate a bit more Parmesan cheese on top of the blossoms
Bake at 400 till cheese is browned slightly and melted 15-20 minutes or so
keep your eye on it as ovens vary 

Total under $4.00 for this side dish